Tuesday, October 23, 2012

5 New Prints at Lanie + Lola


Check out what's new at Lanie + Lola!

1.  Chevron Initial and Name Print $10
2.  Hot Air Balloon Birth Stats Print $12
3.  Confetti and Name Print $10
4.  Elephant Birth Stats Print $12
5.  Polka Dot Initial and Name Print $10

The prints are offered in different colors and sizes. Click on the links to the listings above to see how easy it is to get a print in colors that will fit your space!

No Pay Pal account needed to check out from my shop and Thrifty Abode Readers get free shipping with the code "FREESHIP"!


Friday, September 21, 2012

Dead Ringer: Pottery Barn Hadley Ruched Duvet Cover


via
Pottery Barn Hadley Ruched Queen Duvet Cover:  $159
(shams not included, standard $39 each)

via
Target Simply Shabby Chic Smocked Queen Duvet Set:  $79.99

I've got one more Pottery Barn duvet cover knock off!!!

This one isn't as close as the first one and the Pottery Barn duvet cover isn't available online anymore, but I've seen it in stores recently.

via
Pottery Barn Taylor Diamond Ruched Queen Duvet Cover:  $139

via

Target Home Pinched Pleat Queen Duvet Set:  $69.99


Direct Checkout and Free Shipping From Lanie and Lola


As you can see, you can now use a credit card (no Pay Pal account needed) in my Etsy shop, Lanie and Lola!

And as always, free shipping for Thrifty Abode readers when you use the code "FREESHIP".

Tuesday, September 11, 2012

Pins That I've Tried and I Love


floor cushion tutorial via Living With Punks
For three months Pinterest has been my constant companion in the wee hours of the morning while I nurse my Little One.  I've discovered some pretty great recipes and tips/tricks in all my scrolling.

The following 8 are currently my favorite pins.

1.  DIY Floor Cushion (mine is in the first picture):  I got the itch to make something on Labor Day and had about a yard of fabric on hand.  This project was perfect.  The cushion looks great and it was fairly easy.  I'm pretty proud of myself for getting the piping right!  Pin / Link

2.  "Man-Pleasing Chicken":  Maple syrup, Dijon mustard on chicken thighs....so good.  Pin / Link

3.  Homemade Cheese Crackers:  I had some cheese that I needed to use up before it went bad.  This recipe is so simple and so good.  Little Man and I ate them all in one day!  Pin / Link

4.  NY Times Best Chocolate Chip Cookies:  This has become my go-to cookie recipe.  Crispy on the edges and soft in the middle.  Pin / Link 

5.  Brownie In a Mug:  Really great when you need a quick chocolate fix.  I have eaten way too many of these.  Pin / Link

6.  DIY Microdermabrasion:  I can't really say whether or not this DIY version is comparable to the real thing, but it's a good exfoliator and my skin looked smoother afterwards.  Pin / Link

7.  Homemade cleaners:  All purpose cleaners, natural disinfectants...this link has it all.  Pin / Link

8.  3 Day Potty Training:  I used this post as a guide to potty train Little Man and just like the title says, 3 days is all we needed.  Pin / Link

If  you have any favorite pins to pass on, just leave them in the comments!

Thursday, August 16, 2012

DIY Felt Dog Treats


I haven't had time for many projects lately because I have a two month old that wants to eat every two hours (including during the night), BUT I was able to find a little time to whip up these pretend dog treats.

This craft might seem completely random (and it kind of is), but I was inspired when Little Man was playing pretend with his stuffed dog one morning.  He kept asking me to fill up a couple bowls I'd given him with imaginary treats and water for his dog.  Then he'd pretend to take her (he named her Bell) on a walk to Target and Chipotle.  Ya know, completely normal places that a two year old to want to go.

It was just so cute, and I found myself thinking it would be nice if he had some "real" treats to give his dog.  I figured it wouldn't be too difficult to make something like play food made out of felt and realized that I had all the supplies on hand.

The dog treats only took about an hour to finish.  I wanted to get them done while Little Man was still playing so perfection was not my goal here.  My stitches are sooo uneven and I used the brown yarn as stuffing because I didn't want to spend the time trying to find the polyfill that I have.  The bone pattern I used is attached below the instructions.  I just printed it out on card stock and traced it onto the felt with a pen.


So easy and Little Man really seems to be enjoying them!


Wednesday, August 15, 2012

Update!


Look at those cheeks!  It's been over a month since I posted and this little guy is up to 12 pounds!  Once he got the hang of eating and got over being born a month early, he started packing it on by eating every two hours...even at night.  I'm actually not feeling that tired, but it seems like there's very little time to do anything else but feed him. 

Even though I spend a ton of time on the couch with a baby in my lap,  I have managed to squeeze in a couple of projects.

This isn't decor related at all, but I'm extremely proud of the fact that Little Man has been officially potty trained since the beginning of July!


We did the three day hard-core potty training method and by the third day he had it.  We're kind of up to our elbows in newborn diapers and I can't imagine what it would be like to have to deal with toddler diapers too.  Woo hoo!

In nursery and playroom news:  I swapped the rooms.  I originally intended the stripes for the playroom, but once I got our storage unit in the room I just didn't like how it looked.  I couldn't bare to paint over those stripes that I spent so much time on, so I just moved the nursery furniture into striped room.


I'm liking the stripes on stripes look. 

The old nursery, current playroom is now a light gray.


As you can see, it's kind of a disaster and I'm at a stand still.  I just don't really have the time to get anything done.  The good news is that there's no hurry to get this room finished.  Hopefully I can get working on it when the baby gets on a regular nap schedule.  So, until then I think blog posts are going to be pretty irregular.  I have a little project lined up to be posted tomorrow, but after that it may be a while.

Hope everyone enjoys he rest of summer!

Monday, June 25, 2012

Surprise!

On June 7 my mom and I were supposed to make a little road trip to Ikea and pick up all the stuff I still needed for the playroom.  Instead I called her at 6 AM to tell her that I thought I was in labor and she needed to come watch Little Man while my husband and I went to my OB. 

I spent about half an hour hooked up to a monitor and we were sent to the hospital to deliver.  Baby #2 was arriving a month early!


His weight was fantastic (6lbs. 7oz.) considering how early he was and we are so thankful for that!  He had to spend an extra eight days in the hospital at the special care nursery until he could eat well on his own. The picture above was taken in the nursery while he still had his feeding tube. 

He's been home for a week now and I'm settling into life with two little ones a little earlier than I expected.


Wednesday, May 30, 2012

My Craigslist Stalking Paid Off!


Finally!  After weeks of obsessively checking Craigslist, I came across an Ektorp chair (usually $250) for $50!  I know it looks gross in the picture, but that's because the slipcover was ripped in the front so I just went ahead and took it off  when we got it home, and I'm planning on buying a new white slipcover for $29 when we make our trip to Ikea soon. 

I probably should have waited to post of picture of my chair with a new slipcover for a more dramatic reveal, but I just couldn't wait to share!

Sooooo for all of $80 I will have come in waaaaay below my original $500 budget for a new chair.

Woo hoo!


Tuesday, May 29, 2012

Stripes and Chevron and Dots?


I'm finally finished with those stripes and it feels amazing!  I was kind of nervous about the vertical stripes because horizontal stripes seem to be so "in" right now.  

Evidence:


If you search "striped nursery" on Pinterest, 90% of the stripes on the walls are horizontal, and honestly...those are my favorite.

But then I saw this beautiful picture...

via
....and even though it's not a nursery or playroom it helped me settle on the vertical stripes.  Don't they look so cool?

I hope mine look at least half as cool when I get all the other stuff in the room.  Fingers crossed!

Now on to the chevron portion of this post....


 ....I bought this brown and white chevron from Allegro Fabrics (which I highly recommend!) and I'm going to use it, I'm just not sure if I want it on my curtains like I had originally planned.

These are actually the curtains that gave me the idea to just put fabric on the bottom of my white panels:

via
Looking at these curtains makes me think that I might need a pattern in a larger scale than the chevron I have for the bottoms of my curtains.  Yes?

Maybe something like this (here come the dots)...

via
 
...or maybe I'll just leave them white.  It might start looking a little busy in there now that the walls are striped.  

I'd planned on getting my curtains done as soon as that chevron fabric came in, but now I think I'll be holding off on them 'til most everything else is finished. 

So that's the playroom for now.  

I made some major, major progress in my hunt for a cheap chair (like $50 cheap) for our bedroom over the weekend and I'll share tomorrow!


New Prints and Free Shipping!


Just so you know.....


...this is available in my Etsy Shop.

So is this little monkey.


All prints are $12 for an 8x10, $20 for an 11x14 and $28 for a 16x20.  Thrifty Abode readers get free shipping with the code "FREESHIP"!

To make up for the self promotion I have another post coming up in just a little bit!

Tuesday, May 22, 2012

Crazy Pregnant Lady...


....that's me!  What did I get myself into with these stripes?  I had a plan...a very well thought-out plan, and I still found a way to do things the hardest way possible.

Long story short:  In an effort to not spend $20 more on white paint (I had enough for the white stripes, but not to coat the entire room) I went ahead and measured and taped my walls with just a coat of primer on them.  Then I thought it would be a good idea to add just a touch of brown to my white paint to make it not so stark.  Well, I spilled way more brown into my white paint than I meant to and ruined it.

SOOOO....not only did I have to spend more money on more paint, but I'm also going to be spending more time re-taping so I can paint my white stripes.  I'm a  DIY genius!

I just keep telling myself that I'm over half-way finished.  Also, we didn't get to Ikea this weekend so I have plenty of time to get these walls done before I have to worry about moving any furniture in.

Plus, anything is an improvement when compared to the state of the room just a few weeks ago:


Tuesday, May 8, 2012

State of the Playroom


We're not making a trip to Ikea for another week and a half, so I'm trying to get done what I can get done until then.  

I'm not making much progress...that picture is so sad.

I'm going to be painting during naptime today!  Hope you're doing something way more fun.

Thursday, May 3, 2012

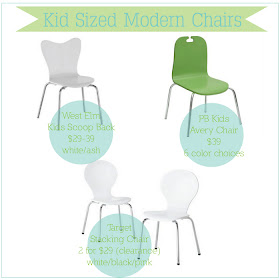
Kid Sized Modern Chairs


via west elm, pb kids, target
Yesterday, in my little Kid's Table DIY/Makeover Roundup, I mentioned that this post had inspired me to use modern style chairs for my boys' table and chair set in their future playroom.  The chairs pictured above are the most affordable ones I came across.

Keep reading or just scroll a tiny bit to see which ones I ended up getting...

The inspiration chairs were actually the set of Target chairs (pictured above) and they were originally $60 for a set.  That seemed a little high to me, plus I didn't really want to use white chairs, and I would have ended up painting them, so I searched a couple other places to find something similar and hopefully in a color I wanted.

I never, ever would have thought that I would have found a decently priced modern-ish chair at PB Kids.....and in exactly the color I wanted.  I think my jaw literally dropped when I walked in the store and saw them.  AND due to some gift cards and coupons (which is why I even bothered to look there and West Elm in the first place) I was able to get two chairs for $50! 

I picked up my chairs yesterday and then came home and started looking up links for this post when I realized that the Target chairs were a good $20 less than the ones that I had just bought.  Doh!  I considered returning the PB Kids chairs, but then realized that between shipping and painting the white Target chairs I probably would have ended up spending $50 on them anyway. 

Those Target chairs are a fantastic deal, but Little Man is already enjoying his!


Wednesday, May 2, 2012

Mini Kid's Table DIY/Make-over Roundup


I've come across some pretty great kid's table and chair DIYs/makeovers since I've been searching for a way to avoid spending $100+ a new set for my boys' playroom.  These are just a few of my favorites.

1.  A little paint and collected chairs from Carrie at Lovely Etc.
2.  Chalkboard paint plus a $10 garage sale find from Lolly Jane.
3.  From scratch and under $30.  Amazing!  Shanty 2 Chic
4.  Another table from scratch plus it's a PB Kids knockoff from Andrea at Strawberry Chic.

That little modern chair in pic number 4 inspired me to find something similar....so I did!  I'll share tomorrow!

Tuesday, May 1, 2012

Office Space Update


A couple weeks ago I started doing a bit of organizing and cleaning in our little office area.  This desk was usually so trashed because it was a space that I just had no idea how to fix.  Then I got my DIY pinboards up and I got a little motivation to get the area looking nice and functional. 

Here's a before that's actually a bit of a cheat.  I had already decluttered and dusted before I realized that I should take some pictures of how horrible our desk was...ya know for a really dramatic change.  Instead the picture below just shows empty pinboards and a junky desk organizer.


And here's a wider shot of our desk now:


Good, not great.  I still have mixed feelings about the black desk organizer.  Not sure if I should paint it or just get rid of it altogether.  Thoughts?

It's coming together little by little.  Here's a quick little list of the stuff I've bought so far to get my desk in shape:
-  Lamp:  $12 at Wal-Mart (Can you believe it?)
-  Glass sugar bowl to hold thumbtacks:  $3 at Target
-  Black Storage boxes for upper shelf:  2 for $14 at Wal-Mart
-  White magazine holder:  $7 on Amazon
-  Little wooden "R":  $1 at Michael's

Saturday, April 28, 2012

Lanie + Lola Giveaway Winner & Free Shipping Code!


Congrats cck!

Just a reminder:  Thrifty Abode readers always get free shipping at Lanie + Lola with the code "FREESHIP"!


Tuesday, April 24, 2012

Money Saving, Space Saving Baby Stuff That I Love


I was the first among my close friends to have a baby and I'm the oldest in my family, so I didn't have anyone to ask about baby gear when it came time to register for our first child.  I kind of ended up getting things that were popular, without really doing too much research. 

Because of that, a few things that were so kindly given to us at our showers just didn't end up fitting our lifestyle.  I've recently done some baby gear purging, AKA:  selling items on Craigslist at an incredible loss just to gain back precious storage space, and I've been mentally compiling lists of things that actually worked for us and that I'm happy to hold on to.

Most of these items are money and space savers...two of them are sleep savers...but a couple, the carrier and the car seat, just plain work even though they aren't much of a deal.


I feel like I need to start my list off with a little disclaimer, so here it is:  A lot of these products are not the most hip or modern, nor are they necessarily the best in their category, but they worked for us!  Every family and baby has different needs and these fit ours.

1.  ERGObaby Performance Carrier: $134.95  Our Ergo was the third baby carrier that we owned and by far the most comfortable.  The Performance is a little different from the regular Ergo in that it's a lot less bulky and more breathable.  We used this on an airplane when Little Man was 8 months old and it was great!

2.  Snug and Tug Swaddle Blanket: $17.99 This was the third kind of swaddle blanket that we used and it's fantastic.  It's designed so well that Little Man could not break out of it.  He slept wonderfully!

3.  Chicco KeyFit Infant Carseat:  $189.99  I don't have experience with other car seats, but this one is so easy to use.

4.  Cuisinart SmartStick Hand Blender:  $59.99  Who needs to spend $120 on a baby food maker?!  Ours was actually only $50 and you can find it at Costco for about $30.  I can't say enough about how much I loved making baby food with this little gadget.  It's also so small that it wasn't a hassle to get it in and out of our cabinets and it didn't take up much space.  The best part is that I still use it!

5.  Joovy Kooper Stroller: $129.99  I did a lot of research before I decided on this stroller.  I wanted something small and light-weight, but substantial enough to take on walks.  I can fold it and pick it up with one hand and it doesn't take up much space in the trunk of our car.  Plus, it looks like it costs a lot more than it does.

6.  bumGenius One-Size AIO Cloth Diaper:  $24.95  Once again,  I don't have experience with other cloth diapers.  We got these and we were set.  They're really easy to use because they're one piece so I just throw 'em the washer.  I don't miss the cost of disposables and these are not much less convenient. 

7.  First Years Newborn to Toddler Feeding Seat:  $30  We just don't have the space for a separate high chair so this one has been strapped to one of our dining chairs since Little Man was about five months old. It's not the prettiest thing, but it takes up so little space that I hardly notice it.

8.  Munchkin Diaper Changing Kit:  $17.79  I've never carried a diaper bag.  I just loaded up this kit  and threw it into my fairly large purse.  So much better than carrying two bags or just one ugly diaper bag.

9.  Fisher Price Take Along Swing:  $49.99  This is a pretty bare bones swing and it's not much to look at, but it did the job for us.  It's so small that we could move it all over the house, up and down our stairs with no problem.  Little Man took great naps (2-3 hours, 2-3 times/day) in it for a long time.

Thursday, April 19, 2012

My First Giveaway!


Is it lame that my first giveaway ever is from my own Etsy Shop?!  Maybe, but I don't care!  Here's what I'm giving away:  one print from my shop in any size.  These make great baby gifts too, so I'd be happy to give away a gift certificate that you could pass along to a friend.  Winner's choice!


Above are my birth stats prints, but I also have a few art prints in the shop now and all the colors are customizable to fit any nursery or kid's room decor and they're all available in 8x10, 11x14, and 16x20. 

There are three ways to enter:
1.  Leave a comment on this post with the words, "PRINT, PLEASE!"
2.  Post a link to this giveaway on Facebook and leave a comment to let me know that you did so.
3.  Pin the picture above to one of your Pinterest boards with the description, "Lanie & Lola Birth Stats Prints" and leave a comment to let me know that you did so.

So that's up to three entries per person!  The giveaway will close on Wednesday April, 25 and I'll pick a random winner. 


Wednesday, April 18, 2012

Tentative Playroom Plans


Here are the tentative plans for my boys' playroom.  Because we are having our second boy I didn't really see the need to switch up all of the decor completely, so I'm using the same color scheme that's in the nursery and I'll be re-using some old pieces.  Some of the items above will also be DIY projects.  For instance, the two pillows are available to buy, but I will probably be making my own.  Same goes for the prints I'll be using in the room.  The toddler bed and the children's table are also just ideas of what I'd like to have.  The toddler bed is from Ikea and it's an odd size, so you have to buy one of their mattresses, plus the crib skirt I already own won't work on it.  The children's table and chairs set is over $120 (that seems to be pretty standard as far as children's furniture goes), so I'd like to be able to find something on Craigslist.

Sources:
1.  K-Mart Pillow
2.  PB Teen Pillow
3.  Bed skirt No longer Available
4.  Ritva Curtains w/ Brown Chevron at the bottom
5.  Ikea Gulliver Toddler Bed
6.  Amazon Gift Mark Children's Table
7.  Ikea Expedit Unit
8.  Target Baskets
9.  Etsy Print
10.  Garnet Hill Crib Sheet

Now all I have to do to get started is clear the room out, paint it, and make a 3 hour trip to Ikea.  Less than three months left!

Tuesday, April 17, 2012

Dead Ringer: Urban Outfitters Slipper Chair and Gypsy Chandelier


via
Urban Outfitters Slipper Chair Indigo Ikat ($329).

via
Target Abstract Slipper Chair-Blue ($269.99).  Target also has a smaller version for $134.99.

And now...it's time to get funky. 

via
Urban Outfitters Large Gypsy Chandelier ($159).

via

Tuesday Morning Multicolored Gypsy Chandelier ($99).

Thursday, April 12, 2012

Affordable Sofas and Chairs


In my search for the perfect, inexpensive, white chair for my bedroom I've come across a few gems that, for one reason or another just aren't quite right for my space, but still very reasonably priced and stylish. 

1.  Linden Street Friday twill slip-covered chair from JC Penney $600.  It comes in a few colors and it looks very much like the Pottery Barn Comfort.  At $600 it's reasonable, but still just out of my price range.

2.  Sandby Sofa from Ikea $299.  I love how sleek this little sofa is!  It would be perfect in an office or a small apartment.  Oh, how I wish the chair in the Sandby collection had arms!

3.  Colette Chair from JC Penney $650.  This chair looks very similar to the Harrison Chair at Williams-Sonoma that starts at $929.  However, it only comes in one fabric and it's out of my price range.

4.  Baldwin Chair from World Market $429.99.  This one looks like the Sweep Chair from West Elm, but it only comes in brown.

5.  Lindley Sofa from World Market $599.   Can you believe a sofa that stylish is only $599?  I wish they made a chair like it.

6.  Linden Street Danbury Chair $550.  I like the lines of this chair and it looks super comfy, but it doesn't come in the right color.


Wednesday, April 11, 2012

Another Pillow Post: Sham into a Bolster


Nope, that's not the same picture from yesterday's post.  I made a little tweak to one of my pillows and even though it's not a huge change, I think it's worth sharing as I can now officially place a check mark next to "freshen up pillows" on my master bedroom to do list.  

I came across this handy dandy bed pillow arrangements illustration done by Marissa at Roost a couple of days ago and it gave me just the inspiration I needed.

via
I decided that the top right arrangement was my fave (we have a queen bed so I have two euro shams instead of 3), which meant that I had one too many standard sized shams and I was in need of a bolster pillow. 

Since my standard sham was 20x26 and the bolster pillow is 16x26 it was just a simple matter of a little cutting and hemming.  I cut the extra 2 inches of fabric flap off of the sides of the pillow and flipped it inside out and made another seam on both sides so the raw edges wouldn't show when I turned it right side out.   Then I just took two inches off of the top and bottom with the sewing machine.  So easy and I think the slightly smaller bolster with clean edges instead of fabric flaps is a much cleaner look.

Thanks for the inspiration, Marissa!

Tuesday, April 10, 2012

DIY Ribbon Embellished Euro Pillow Shams


A while ago I listed "freshen up pillows" on my to-do list for our master bedroom.  Well, since the other things on my to-do list require spending a bit of money and making a three hour trip to Ikea, I figured I could go ahead and knock the cheapest item off my list first.

There is a bit of sewing involved which made me put off this project for about two months, but I'm so glad I finally got it done!  AND it only cost $23 to get these shams completed.  Woo Hoo!

Here's a quick break down of what I used and what it cost:
-  4 yards of fabric from Jo-Ann:  $12 (I had a really good coupon)
-  7 yards of white 7/8 inch grosgrain ribbon from Michael's:  $2.50 (Yup, I used a coupon.  Plus, I had a gift card, so technically it was free!)
-  1 26x26 euro pillow insert from Target:  $11 (I already owned 1 insert.)
-  7 yards of Heat n' Bond:  $3 (I already had it on hand)

And here's the process.  First,  if measuring and cutting and sewing make you break a sweat then grab an iced coffee and settle in.  Just think of the results and remind yourself that it will all be worth it.

But seriously....

1.  Spread your fabric out and trace (1) 30x30 square and (2) 20x30 rectangles.  These will be the pieces of your pillow.  I like to use poster board because it's nice and stiff and I don't have to worry about keeping my corners square.


The square will be the front of your pillow and the two rectangles will be the back flaps.  Leave a good inch between the peices.  You'll need some room to cut.  The lines will be a guide and show you where to sew. 

2.  Cut out your square and rectangles. 


3.  Hem the edges of the 20x30 panels that will be the flaps on the back of the pillow.  You need to hem one of the 30 inch raw edges on each of the panels.  I fold the edges over twice then iron them so they stay down.

Then sew!


4.  After both back panels are hemmed, attach the corners of one of the flaps to the front 30x30 panel of the pillow with a pin.  Make sure the back sides of the fabric is facing out.  Repeat with the other back flap.


5.  Sew!  Follow the lines drawn on the fabric and re-enforce the corners by double-backing on them.  Make sure those pins are removed before the needle gets there.

So now you should have a 30x30 pillow sham.  Ta da!

6.  Turn your sham right side out and iron the edges and corners flat.


7.  Lay your sham out and trace a 26x26 inch square onto your sham with chalk.  Measure to make sure you have 2 inches all around the chalk square so you know it's centered.


8.  Sew!  Just follow the line of the chalk.

You should have a 26x 26 inch finished sham now.  Time to add the ribbon. 

9.  Trace a 12x12 inch square onto the center of the sham with chalk then trace 4x4 inch squares onto the corners of the bigger square. 


I used Debbie's tutorial at Visual Eye Candy to add my ribbon.  She's got great pictures and I was so determined to get my shams finished that I pretty much forgot to take my own, so I'm happy to just link to her how-to. 


Thanks for the instructions Debbie!

And a little bit of ironing...


and here they are on my bed again.


 So glad to have this finished!

p.s.  This tutorial is very similar to my original envelope pillow tutorial, I've just used specific measurements here for a 26x26 inch sham.

I'll be linking up to: